One of the best ways to learn Dynamo and start getting familiar with the different Nodes is to try and create a simple Visual Program on your own. We will do this by coming up with a simple script that could potentially be added to. Let’s walk through this process.
Manual Vs. Automatic

Let’s Create One
If you are trying to edit something in the Revit model, sometimes it is easier to pop open the Library and navigate to the Revit section. You want to start with selection and think about what data you are trying to edit. In this example, we want to have Dynamo create a view and the view name for us automatically based off the levels in the model. This could eventually lead into creating sheets and placing the views on a sheet automatically.

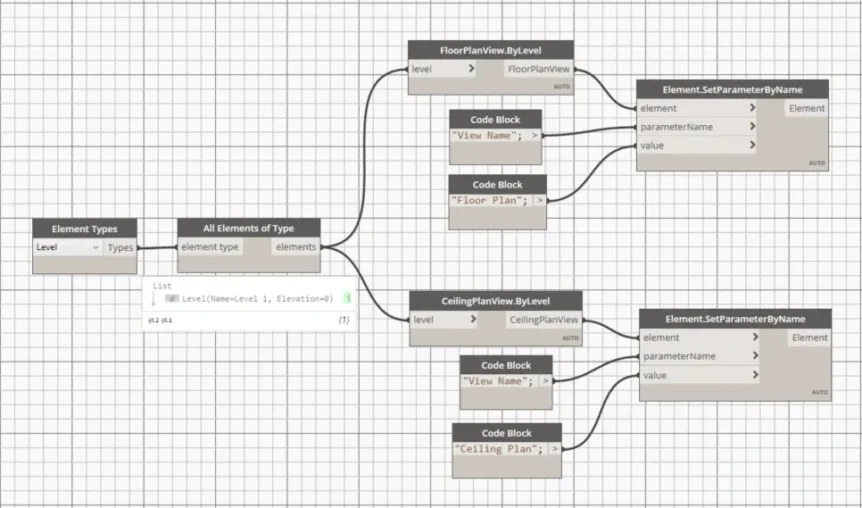
Starting with selection and browsing through the Nodes in the library, the one that makes the most sense to use would be the Element Types Node. This Node lets you select elements in the Revit model by type. In this case, we would select Level from the drop down, since we want to create the views by level. In order to grab all the levels in the Revit model, we will need to connect an All Elements of Type Node. The output of these two Nodes together will be a list of all the Levels currently in the project. With these properly selected, we can move on to creating the views. There are two Nodes that do this in Dynamo, one that creates floor plans and one that creates ceiling plans. The next step is to then pull those Nodes into the workspace and connect both to the All Elements of Type Node. The FloorPlanView.ByLevel and CeilingPlanView.ByLevel Nodes will create those views for us based off the levels.
Next, we will need to figure out how to name the views. This can be easily done with the Element.SetParameterByName. This Node allows you to find a parameter in the model by its name, and then apply a new value to it. We want to edit the name of the views, so the parameter we need here is the “View Name” parameter. We can do this by adding a Code Block to the workspace. Code Blocks allow us to type in the exact name of the parameter as shown. Next, we need to set the new value, here I used “Floor Plan” and “Ceiling Plan”. By using a Code Block, we can actually set the new value to be whatever we would like by simply typing in what we want it to read. Now, this Visual Program will find that parameter, and give it the value we set. And now you’ve created a working Visual Program. This will now grab all Levels in the project, create a floor and ceiling plan for each, and name them automatically.
Make it Make Sense

Organization is important when creating your Visual Program, especially when it comes to more complicated and longer scripts. One way to keep your Visual Program organized is by grouping nodes. Window select the nodes you want to group together. Then right click and select group nodes. Once you’ve done that, there will be a box around the selected Nodes. You can double click on the group in order to change the title and left click to change the color. This can be extremely helpful to noting what group of Nodes is doing what. It can also be helpful when sharing your Visual Program with others. As you can see here, I have grouped together all the Nodes related to floor plans in one group and ceiling plans in another group. This way, when someone else opens this Visual Program, they have a better idea of what is happening. You may also add notes to the workspace. This is an editable text field where you can enter in any information to better explain the Visual Program. At the top right, click on edit and in the drop down find Create Note. Once you add a note to the workspace, the text field will pop up. You can edit it by double clicking or right clicking the Note Node. This is a good example of Visual Program that can be added to, so it’s extremely important to keep it clean and organized for when it is revisited.

