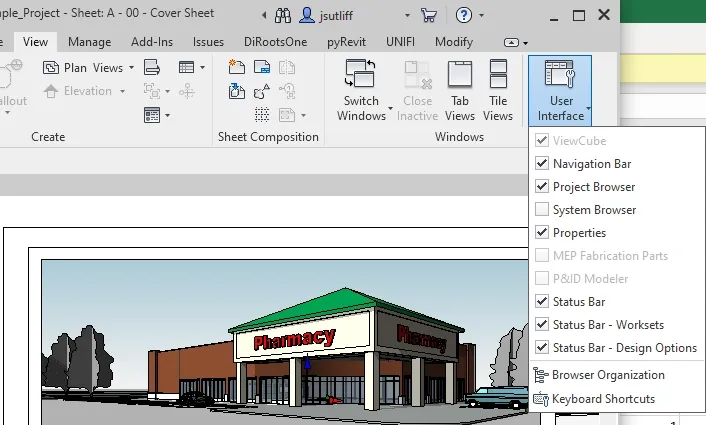
One thing I did not mention in last week’s blog, I am using Revit 2020 for the examples in the blog. Upon some deeper investigation, the Commercial_Sample_Project.rvt is not an option in Revit 2021 or 2022. Regardless, the functionality and location of the tools and information translate across versions. For this week’s blog, I will continue with that file in Revit 2020.
Another important thing to know about Revit – there is no backward compatibility with any files, families, or objects. This is VITALLY important to keep in mind, especially in working with other teams on projects. For custom content, keep all of those elements in an older version of Revit, you can upgrade but can never go back.
The nice thing about the Properties and Project Browser, these windows can be moved and snapped to different areas within the Revit window. For me, I prefer both windows to be full length instead of nested together. Experiment with the locations of these to set up Revit the best way for you. To move and snap these windows, left-click and hold, the top of the window where it says “Properties” and “Project Browser”. You will now be able to disconnect the window and move it to where you would like it. These windows can float separate from the main Revit window, however, I do not recommend using this in case you have multiple monitors set up. If these windows remain floating, they can get ‘stuck’ on a monitor you do not have access to if working outside of your standard office setting. As you move these windows around, you will see a blue box that shows where it will snap to within the Revit window. Sometimes it can take a little putzing to get it exactly where you want it, but when you do, release the left mouse button. You can also adjust the horizontal width by grabbing the inside of the window when the side-to-side arrow icon is visible.
To activate a view in the Project Browser, expand the “Views” by clicking the plus (+) icon to the left. This button will expand any of the menus visible in the Project Browser. As you can see, there are subgroups under the Views that also have additional views in those groups. We will open up the “Floor Plans” to show all available floor plans in this project. Double-clicking on “Level 1” will activate that specific view and allow us to make adjustments.
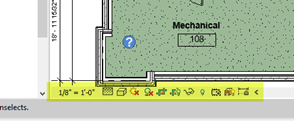
Once a view is open you will see additional View Options are available at the bottom-left of the active view window. From left to right you will find the view scale, detail level, model display, sun path, shadows, turn on or off view crop, turn on or off the view crop region, temporary hide/isolate (a HEAVILY used tool for me), reveal hidden elements, temporary view properties (also HEAVILY used), reveal analytical model, and finally, show constraints.

To change these view options, left-click on any of the icons to open the menu. The scale changes the scale of the view – there are many scales to choose from and correlate directly to the view when placed on a sheet.
There are three options for the Detail Level – Course, Medium, and Fine. Depending on how the families are designed, the look of them will change at one or more of these levels. For instance, a conduit is shown as a single line in Course and Medium but shown as the full conduit in Fine.
The graphic display changes how the elements appear in the view. The wireframe view is just as it sounds. Each element will only show the ‘edge line’ of the geometry and be fully transparent. Hidden line shows the ‘edge line’ and the infill is solid white. Each family can be built with textures or colors on the geometry and changing from hidden line to shaded will show the basic colors. Realistic will show the actual texture associated with the family, for example – brick, wood, or concrete.
The Sun Path and shadows are just as they sound. You can turn these options on and off depending on your needs. The Crop View and Crop Region allow you to change what is visible in the view. These two work in tandem together. Turning on and off the Crop Region shows you where the Crop View will, well, crop the view to the boundaries of the region. After selecting the Crop View, if you cannot manually adjust this, a Scope Box has been applied to the view. Additional details on the Scope Box will be a part of a future blog post. To adjust the Crop Region, grab the blue handles and move them into the position you need to crop. Turning on and off the Crop View does just what it describes.
The Temporary Hide/Isolate button is pretty self-explanatory. Any elements that you have selected can be TEMPORARILY hidden or isolated, which prevents much heartache down the line. Hiding elements in a view is a BAD practice for many reasons – it is easy to forget why or where these elements are and it can take quite a bit of time to find the fix. You can also hide or isolate an entire category within the view. This can be very handy if you are looking for a few specific items and they are lost in the background. Reveal Hidden Elements does just as it sounds. If elements are hidden in the view, this button changes visible elements into halftone and highlights in magenta the elements that are hidden. Cyan elements are temporarily hidden.
Temporary View Properties is a wonderful tool and another heavily used tool for me. This allows you to TEMPORARILY adjust any of the elements in the Visibility Graphics window to help troubleshoot any issues you happen to have with the view you are working in. All you need to do is Enable Temporary View Properties, then you can adjust as needed. To turn it off, select Restore View Properties. This is very versatile in all windows that you are working in because there are no long-term effects. If the Visibility Graphics window is grayed out, that means there is a View Template that is tied to the specific view opened – a perfect reason to use the temporary view! In my experience, it is very unwise to make changes to the template because it will affect many more views than the one intended.
The last two are for showing/hiding any Analytical Models or any constraints that may be tied to elements.
Whew! That was a ton of information to go through and learn about. Hopefully, this breakdown and example videos help you understand more about how Revit works. Understanding these tools and exploring their functionality is a fun way to get more familiar with Revit and how powerful of a tool it is. Next week we will dive deeper into the Project Browser and how it can be organized.
Struggling to find the menu or toolset you are looking for? Do you have Revit questions that have been annoying you for a long time? BIMTM offers training services and we would be happy to help you learn more and get comfortable with Revit and become a true badass!

